Monday, September 6, 2021

Lesson 8 : String Manipulation

 String manipulation is an important part of programming because it help to process data that come in the form of non-numeric types such as name, address, city, book title and more.

8.1 String Manipulation Using + and & signs.

Strings can be manipulated using the & sign and the + sign, both perform the string concatenation which means combining two or more smaller strings into larger strings. For example, we can join "Visual" and "Basic" into "Visual Basic" using "Visual"&"Basic" or "Visual "+"Basic", as shown in the example below

Example 8.1(a)

Private Sub Button1_Click(ByVal sender As System.Object, ByVal e As System.EventArgs) Handles Button1.Click
Dim text1, text2, text3 As String
 text1 = "Visual"
 text2 = "Basic"
 text3 = text1 + text2
 Label1.Text = text3
End Sub

The line text3=text1+ text2 can be replaced by text3=text1 & text2  and produced the same output. However, if one of the variables is declared as numeric data type, you cannot use the + sign, you can only use the & sign.

Example 8.2

Dim text1, text3 as string
Dim Text2 As Integertext1 = "Visual"
 text2=22
 text3=text1+text2
 Label1.Text = text3

This code will produce an error because of data mismatch.However, using & instead of + will be all right.

Dim text1, text3 as string
Dim Text2 As Integer
 text1 = "Visual"
 text2=22
 text3=text1 & text2
 Label1.Text = text3

You can combine more than two strings to form a larger strings, like the following example:

Public Class Form1
Private Sub Button1_Click(ByVal sender As System.Object, ByVal e As System.EventArgs) Handles Button1.Click
Dim text1, text2, text3, text4, text5, text6 As String
 text1 = "Welcome"
 text2 = " to"
 text3 = " Visual"
 text4 = " Basic"
 text5 = " 2010"
 text6 = text1 + text2 + text3+text4+text5
 Label1.Text = text6
End Sub
End Class

Running the above program will produce the following screen shot, as shown in Figure 8.1
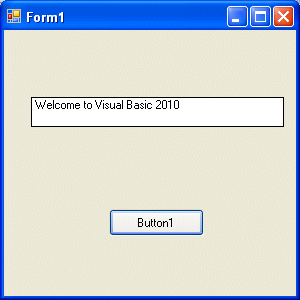
Figure 8.1

8.2 String Manipulation Using VB2010 Built-in Functions

A function is similar to a normal procedure but the main purpose of the function is to accept a  certain input and return a value which is passed on to the main program to finish the execution.There are numerous string manipulation functions built into VB2010 but I will only discuss a few here and will explain the rest of them in later Lessons.

8.2 (a) The Len Function

The length function returns an integer value which is the length of a phrase or a sentence, including the empty spaces. The format is

Len ("Phrase")

For example,

Example 8.3

Public Class Form1
Private Sub Button1_Click(ByVal sender As System.Object, ByVal e As System.EventArgs) Handles Button1.Click
 Label1.Text = Len(TextBox1.Text)
End Sub
End Class

The output is shown in Figure 8.2

Figure 8.2

8.2(b) The Right Function

The Right function extracts the right portion of a phrase. The syntax is

 Microsoft.VisualBasic.Right("Phrase",n)

Example 8.3

Private Sub Button1_Click(ByVal sender As System.Object, ByVal e As System.EventArgs) Handles Button1.Click
Dim text1 As String
 text1 = TextBox1.Text
 Label1.Text = Microsoft.VisualBasic.Right(text1, 4)
End Sub

The above program will return four right most characters of the phrase entered into the textbox.

The Outputis shown in Figure 8.3

Figure 8.3

*The reason of using the full reference is because many objects have the Right properties so using Right on its own will make it ambiguous to VB2010.

8.2(c)The Left Function

The Left function extract the left portion of a phrase. The format is

 
            Microsoft.VisualBasic.Left("Phrase",n)

Where n is the starting position from the left of the phase where the portion of the phrase is going to be extracted.  For example,

Microsoft.VisualBasic.Left ("Visual Basic", 4) = Visu
Lesson 7 : Mathematical Operations

 Computer can perform mathematical calculations much faster than human beings. However, computer itself will not be able to perform any mathematical calculations without receiving instructions from the user. In VB2010, we can write code to instruct the computer to perform mathematical calculations such as addition, subtraction, multiplication, division and other kinds of arithmetic operations. In order for VB2010 to carry out arithmetic calculations, we need to write code that involve the use of various arithmetic operators. The VB2010 arithmetic operators are very similar to the normal arithmetic operators, only with slight variations. The plus and minus operators are the same while the multiplication operator use the * symbol and the division operator use the / symbol. The list of VB2010 arithmetic operators are shown in table 7.1  below:

Table 7.1 Arithmetic Operators

OperatorMathematical FunctionExample
+Addition 1+2=3
- Subtraction 10-4=6
^ Exponential 3^2=9
* Multiplication 5*6=30
/ Division 21/7=3
Mod Modulus(returns the remainder of an integer division) 15 Mod 4=3
\ Integer Division(discards the decimal places) 19/4=4

Example 7.1

In this program, you need to insert two Textboxes, four labels and one button. Click the button and key in the code as shown below. Note how the various arithmetic operators are being used. When you run the program, it will perform the four basic arithmetic operations and display the results on the four labels.

Dim num1, num2, difference, product, quotient As Single
num1 = TextBox1.Text
num2 = TextBox2.Text
 sum=num1+num2
 difference=num1-num2
 product = num1 * num2
 quotient=num1/num2
 Label1.Text=sum
 Label2.Text=difference
 Label3.Text = product
 Label4.Text = quotient

Example 7.2 Pythagoras Theorem

The program can use Pythagoras Theorem to calculate the length of hypotenuse  c given the length of the adjacent side a and the opposite side b. In case you have forgotten the formula for the Pythagoras Theorem, it is written as

			c^2=a^2+b^2
				

The Code

Private Sub Button1_Click(ByVal sender As System.Object, ByVal e As System.EventArgs) Handles Button1.Click Dim a, b, c As Single a = TextBox1.Text b = TextBox2.Text c=(a^2+b^2)^(1/2) Label3.Text=c End Sub

Example 7.3: BMI Calculator

A lot of people are obese now and it could affect their health seriously . Obesity has proven by the medical experts to be a one of the main factors that brings many adverse medical problems, including the the heart disease.   If your BMI is more than 30, you are considered obese. You can refer to the following range of BMI values for your weight status.

  • Underweight = <18.5
  • Normal weight = 18.5-24.9
  • Overweight = 25-29.9
  • Obesity = BMI of 30 or greater

In order to calculate your BMI, you do not have to consult your doctor, you could just use a calculator or a home made computer program, this is exactly what I am showing you here. The BMI calculator is a Visual Basic program that can calculate the body mass index, or BMI of a person based  on the body weight in kilogram and the body height in meter. BMI can be calculated using the formula

weight/( height)2
			

where weight is measured in kg and height in meter. If you only know your weight and height in lb and feet, then you need to convert them to the metric system (you could indeed write a VB program for the conversion).

The Code

Private Sub Button1_Click(ByVal sender As System.Object, ByVal e As System.EventArsgs) Handles Button1.Click
Dim height, weight, bmi As Single
 height = TextBox1.Text
 weight = TextBox2.Text
 bmi = (weight) / (height ^ 2)
 Label4.Text = bmi
End Sub

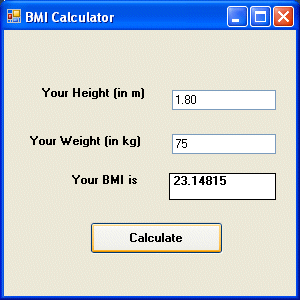
The output is shown in the Figure 7.1 below. In this example, your height is 1.80m( about 5 foot 11),your weight is 75 kg( about 168Ib), and your BMI is about 23.14815. The reading suggests that you are healthy. (Note; 1 foot=0.3048, 1 lb=0.45359237 kilogram)

From the above examples, you can see that perform arithmetic operations is relatively easy. Here are more arithmetic projects you can try to programs:

  • Area of a triangle
  • Area of a rectangle
  • Area of a circle
  • Volume of a cylinder
  • Volume of a cone
  • Volume of a sphere
  • Compound interest
  • Future value
  • Mean
  • Variance
  • Sum of angles in polygons
  • Conversion of lb to kg
  • Conversion of Fahrenheit to Celsius

Lesson 6 : Managing Data

 There are many types of data that we come across in our daily life. For example, we need to handle data such as names, addresses, money, date, stock quotes, statistics and etc everyday. Similarly in Visual Basic 2010, we have to deal with all sorts of  of data, some can be mathematically calculated while some are in the form of text or other forms. VB2010 divides data into different types so that it is easier to manage when we need to write the code involving those data.

6.1 Visual Basic 2010 Data Types

Visual Basic 2010 classifies the information mentioned above into two major data types, they are the numeric data types and the non-numeric data types.

6.1.1 Numeric Data Types

Numeric data types are types of data that consist of numbers, which can be computed mathematically with various standard operators such as add, minus, multiply, divide and so on. Examples of numeric data types are your examination marks, your height, your weight, the number of students in a class, share values, price of goods, monthly bills, fees and etc. In Visual Basic 2010, numeric data are divided into 7 types, depending on the range of values they can store. Calculations that only involve round figures or data that don't need precision can use Integer or Long integer in the computation. Programs that require high precision calculation need to use Single and Double decision data types, they are also called floating point numbers. For currency calculation , you can use the currency data types. Lastly, if even more precision is requires to perform calculations that involve a many decimal points, we can use the decimal data types. These data types summarized in Table 6.1.


Table 6.1 Numeric Data Types

TypeStorageRange of Values
 Byte 1 byte  0 to 255
 Integer 2 bytes  -32,768 to 32,767
 Long 4 bytes -2,147,483,648 to 2,147,483,648
 Single 4 bytes-3.402823E+38 to -1.401298E-45 for negative values 1.401298E-45 to 3.402823E+38 for positive values.
 Double 8 bytes-1.79769313486232e+308 to -4.94065645841247E-324 for negative values 4.94065645841247E-324 to 1.79769313486232e+308 for positive values.
 Currency 8 bytes-922,337,203,685,477.5808 to 922,337,203,685,477.5807
 Decimal 12 bytes+/- 79,228,162,514,264,337,593,543,950,335 if no decimal is use +/- 7.9228162514264337593543950335 (28 decimal places).

6.1.2 Non-numeric Data Types

Nonnumeric data types are data that cannot be manipulated mathematically using standard arithmetic operators. The non-numeric data comprises  text or string data types, the Date data types, the Boolean data types that store only two values (true or false), Object data type and Variant data type .They are summarized in Table 6.2

Table 6.2: Nonnumeric Data Types

Data Type

Storage

Range

String(fixed length)

Length of string

1 to 65,400 characters

String(variable length)

Length + 10 bytes

0 to 2 billion characters

Date

8 bytes

January 1, 100 to December 31, 9999

Boolean

2 bytes

True or False

Object

4 bytes

Any embedded object

Variant(numeric)

16 bytes

Any value as large as Double

Variant(text)

Length+22 bytes

Same as variable-length string

6.1.3 Suffixes for Literals

Literals are values that you assign to a data. In some cases, we need to add a suffix behind a literal so that VB2010 can handle the calculation more accurately. For example, we can use num=1.3089# for a Double type data. Some of the suffixes are displayed in Table 6.3.

Table 6.3
SuffixData Type>
&Long
!Single
#Double
@Currency

In addition, we need to enclose string literals within two quotations and date and time literals within two # sign. Strings can contain any characters, including numbers. The following are few examples:

memberName="Turban, John." 
TelNumber="1800-900-888-777" 
LastDay=#31-Dec-00# 
ExpTime=#12:00 am#

6.2 Managing Variables

Variables are like mail boxes in the post office. The contents of the variables changes every now and then, just like the mail boxes. In term of VB2010, variables are areas allocated by the computer memory to hold data. Like the mail boxes, each variable must be given a name. To name a variable in Visual Basic 2010, you have to follow a set of rules.

6.2.1 Variable Names

The following are the rules when naming the variables in Visual Basic

  • It must be less than 255 characters
  • No spacing is allowed
  • It must not begin with a number
  • Period is not permitted
  • Cannot use exclamation mark (!), or the characters @, &, $, #
  • Cannot repeat names within the same level of scope.

Examples of valid and invalid variable names are displayed in Table 6.4

Table 6.4 Examples of Valid and Invalid Variable Names
Valid NameInvalid Name
My_CarMy.Car
ThisYear1NewBoy
Long_Name_Can_Be_USEDHe&HisFather *& Not allowed

6.2.2 Declaring Variables

In Visual Basic 2010, one needs to declare the variables before using them by assigning names and data types. If you fail to do so, the program will show an error. They are normally declared in the general section of the codes' windows using the Dim statement. The syntax is as follows:

Dim Variable Name As Data Type

Example 6.1

Private Sub Form1_Load(ByVal sender As System.Object, ByVal e As System.EventArgs) Handles MyBase.Load
 Dim password As String
 Dim yourName As String
 Dim firstnum As Integer
 Dim secondnum As Integer
 Dim total As Integer
 Dim doDate As Date
End Sub

You may also combine them in one line, separating each variable with a comma, as follows:

Dim password As String, yourName As String, firstnum As Integer,.............

For string declaration, there are two possible formats, one for the variable-length string and another for the fixed-length string. For the variable-length string, just use the same format as example 6.1 above. However, for the fixed-length string, you have to use the format as shown below:

Dim VariableName as String * n

where n defines the number of characters the string can hold.

Example 6.2

Dim yourName as String * 10

yourName can hold no more than 10 Characters.

6.2.3 Assigning Values to Variables

After declaring various variables using the Dim statements, we can assign values to those variables. The general format of an assignment is

Variable=Expression

The variable can be a declared variable or a control property value. The expression could be a mathematical expression, a number, a string, a Boolean value (true or false) and etc. The following are some examples:

firstNumber=100
secondNumber=firstNumber-99
userName="John Lyan"
userpass.Text = password
Label1.Visible = True
Command1.Visible = false
Label4.Caption = textbox1.Text
ThirdNumber = Val(usernum1.Text)
total = firstNumber + secondNumber+ThirdNumber

6.3 Constants

Constants are different from variables in the sense that their values do not change during the running of the program.

6.3.1 Declaring a Constant

The syntax to declare a constant is

Const Constant Name As Data Type = Value

Example 6.3

Private Sub Form1_Load(ByVal sender As System.Object, ByVal e As System.EventArgs) Handles MyBase.Load
Const Pi As Single=3.142
Const Temp As Single=37
Const Score As Single=100
End Sub

Lesson 5 : Writing the Code

In the previous Lesson, you have learned that Visual Basic 2010 is an object oriented programming language. You have understood the meanings of class, object, encapsulation inheritance as well as polymorphism. You have also learned to write some simple programs without much understanding some underlying foundations and theories. In this Lesson, you will learn some basic theories about VB2010 programming but we will focus more on learning by doing, i.e. learning by writing programs .I will keep the  theories short so that it would not be too difficult for beginners.

5.1 The event Procedure

Visual Basic 2010 is also an event driven programming language. Event driven means the user will decide what to do with the program, whether he/she wants to click the command button, or he/she wants to enter text in a text box, or he/she might wants to close the application and etc. An event is related to an object, it is an incident that happens to the object due to the action of the user , such as a click or pressing a key on the keyboard.

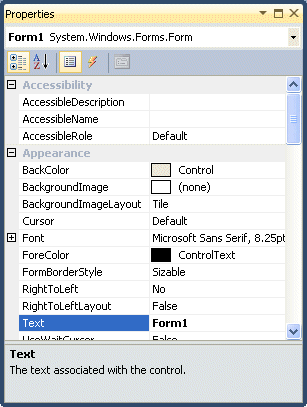
A class has events as it creates an instant of a class or an object. When we start a windows application in VB2010 in previous chapters, we will see a default form with the Form1 appears in the IDE, it is actually the Form1 Class that inherits from the Form class System.Windows.Forms.Form, as shown in the Form1 properties window in Figure 5.1.

Figure 5.1 The Properties Window


When we click on any part of the form, we will see the code window as shown in Figure 5.2. The is the structure of an event procedure. In this case, the event procedure is to load Form1 and it starts with Private Sub and end with End Sub. This procedure includes the Form1 class and the Load event, and they are bind together with an underscore, i.e. Form_Load. It does nothing other than loading an empty form. You don't have to worry the rest of the stuff at the moment, they will be explained in later Lessons.

Public Class Form1

Private Sub Form1_Load(ByVal sender As System.Object, ByVal e As System.EventArgs) Handles MyBase.Load

End Sub

End Class

In addition, there are other events associated with the Form1 class. These events are click, cursorChanged, DoubleClick, DragDrop, Enter and so on, as shown in Figure 5.2(It appears when you click on the upper right pane of the code window)

Figure 5.2 The Events


5.2 Writing the code

Now you are ready to write the code for the event procedure so that it will do something more than loading a blank form. The code must be entered between Private Sub.......End Sub. Let's enter the following code :

Public Class Form1

Private Sub Form1_Load(ByVal sender As System.Object, ByVal e As System.EventArgs) Handles MyBase.Load

Me.Text = "My First VB2010 Program"
Me.ForeColor = Color.ForestGreen
Me.BackColor = Color.Cyan

End Sub

End Class

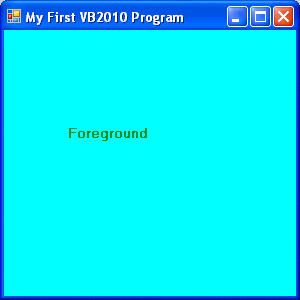
The first line of the code will change the title of the form to My First VB2010 Program, the second line will change the foreground object to Forest Green( in this case, it is a label that you insert into the form and change its name to Foreground) and the last line changes the background to Csyan color. The equal in the code actually is used to assign something to the object, like assigning yellow color to the foreground of the Form1 object (or an instance of Form1). Me is the name given to the Form1 class. We can also call those lines as Statements. So, the actions of the program will depend on the statements entered by the porgrammer.

The output is shown in the Figure 5.3

Figure 5.3

Here is another example:

Private Sub Button1_Click_1(ByVal sender As System.Object, ByVal e As System.EventArgs) Handles Button1.Click

 Dim name1, name2, name3 As String
 name1 = "John"
 name2 = "Georges"
 name3 = "Ali"
 MsgBox(" The names are " & name1 & " , " & name2 & " and " & name3)

End Sub

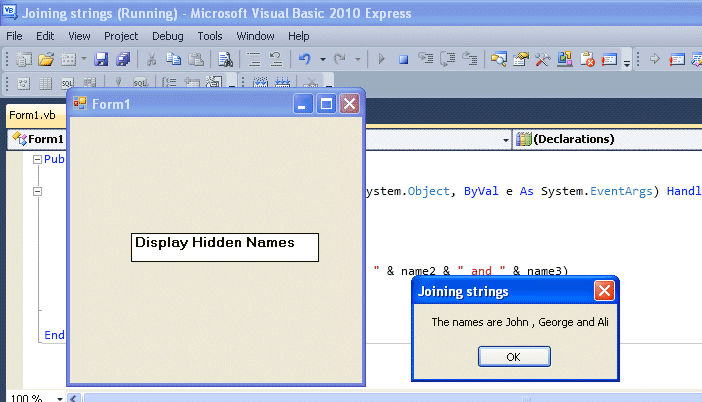
In this example, you insert one command button into the form and rename its caption as Show Hidden Names. The keyword Dim is to declare variables name1, name2 and name3 as string, which means they can only handle text. The function MsgBox is to display the names in a message box  that are joined together by the "&" signs. The output is as shown in Figure 5.4

Figure 5.4


Lesson 4 : Object Oriented Programming

 In first three Lessons, you have learned how to enter the program code and run some sample Visual Basic 2010 programs but without much understanding about the logics of VB2010 programming. Now, let's get down to learning a few basic rules about writing the VB2010 program code.

First of all, let me say that though VB2010 is very much similar to VB6 in terms of Interface and program structure, their underlying concepts are quite different. The main different is that VB2010 is a full Object Oriented Programming Language while VB6 may have OOP capabilities, it is not fully object oriented. In order to qualify as a fully object oriented programming language, it must have three core technologies namely encapsulation, inheritance and polymorphism. These three terms are explained below:


Encapsulation

Encapsulation refers to the creation of self-contained modules that bind processing functions to the data. These user-defined data types are called classes. Each class contains data as well as a set of methods which manipulate the data. The data components of a class are called instance variables and one instance of a class is an object. For example, in a library system, a class could be member, and John and Sharon could be two instances (two objects) of the library class.

Inheritance

In object-oriented programming, classes are created according to hierarchies. Inheritance allows the structure and methods in one class to be passed down the hierarchy. That means less programming is required when adding functions to complex systems. If a step is added at the bottom of a hierarchy, then only the processing and data associated with that unique step needs to be added. Everything else about that step is inherited. The ability to reuse existing objects is considered a major advantage of object technology.

Polymorphism

Object-oriented pogramming allows procedures about objects to be created whose exact type is not known until runtime. For example, a screen cursor may change its shape from an arrow to a line depending on the program mode. The routine to move the cursor on screen in response to mouse movement would be written for "cursor," and polymorphism allows that cursor to take on whatever shape is required at runtime. It also allows new shapes to be easily integrated.

Visual Basic 6 is not a full OOP in the sense that it does not have inheritance capabilities although it can make use of some benefits of inheritance. On the other hand, Visual Basic 2010 is a fully functional Object Oriented Programming Language, just like other OOP such as C++ and Java. It is different from VB6 because it focuses more on the data itself while VB6 focuses more on the actions. VB6 and earlier versions of VB are known as procedural or functional programming language. Some other procedural programming languages are C, Pascal and Fortran.

VB2010 allows users to write programs that break down into modules. These modules will represent the real-world objects and are knows as classes or types. An object can be created out of a class and it is known as an instance of the class. A class can also comprise subclass. For example, apple tree is asubclassof theplantclass and the apple in your backyard is an instance of the apple tree class. Another example is  a student class is a subclass of the human class while your son John is an instance of the student class.

A class consists of data members as well as methods. In VB2010, the program structure to define a Human class can be written as follows:

Public Class Human
'Data Members
Private Name As String
Private Birthdate As String
Private Gender As String
Private Age As Integer
'Methods
Overridable Sub ShowInfo( )
MessageBox.Show(Name)
MessageBox.Show(Birthdate)
MessageBox.Show(Gender)
MessageBox.Show(Age)
End Sub
End Class

After you have created the human class, you can create a subclass that inherits the attributes or data from the human class. For example, you can create a students class that is a subclass of the human class. Under the student class, you don't have to define any data fields that are already defined under the human class, you only have to define the data fields that are different from an instance of the human class. For example, you may want to include StudentID and Address in the student class. The program code for the StudentClass is as follows:

Public Class Students
 Inherits Human
 Public StudentID as String
Public Address As String
Overrides  Sub ShowInfo( )
 MessageBox.Show(Name)
 MessageBox.Show(StudentID)
 MessageBox.Show(Birthdate)
 MessageBox.Show(Gender)
 MessageBox.Show(Age)
 MessageBox.Show(Address)

End Sub

We will discuss more on OOP in later Lessons. In the next Lesson, we will start learning simple programming techniques in VB2010

Lesson 3: Working with Control Properties


3.1 The Control Properties

Before writing an event procedure for the control to response to a user's input, you have to set certain properties for the control to determine its appearance and how it will work with the event procedure. You can set the properties of the controls in the properties window at design time or at runtime. Figure 3.1 is a typical properties window for a form.

Figure 3.1 The Properties Window


The title of the form is defined by the Text property and its default name is Form 1. To change the form's title to any name that you like, simple click in the box on the right of the Text property and type in the new name, in this example, the title is Addition Calculator. Notice that this title will appear on top of the windows.  In the properties window, the item appears at the top part is the object currently selected (in Figure 3.1, the object selected is Form1). At the bottom part, the items listed in the left column represent the names of various properties associated with the selected object while the items listed in the right column represent the states of the properties. Properties can be set by highlighting the items in the right column then change them by typing or selecting the options available. You may also  alter other properties of the form such as font, location, size, foreground color, background color ,MaximizeBox, MinimizeBox and etc.

You can also change the properties of the object at runtime to give special effects such as change of color, shape, animation effect and so on. For example the following code will change the form color to yellow every time the form is loaded. VB2010 uses RGB(Red, Green, Blue) to determine the colors. The RGB code for yellow is 255,255,0. Me in the code refer to the current form and Backcolor is the property of the form's background color. The formula to assign the RGB color to the form is Color.FormArbg(RGB codes).

Public Class Form1
Private Sub Form1_Load(ByVal sender As System.Object, ByVal e As System.EventArgs) Handles MyBase.Load

 Me.BackColor = Color.FromArgb(255, 0, 255)

End Sub
End Class

You may also use the follow procedure to assign the color at run time.

Private Sub Form1_Load(ByVal sender As System.Object, ByVal e As System.EventArgs) Handles MyBase.Load
   
 Me.BackColor = Color.Magenta

End Sub

Both procedures above will load the form with a magenta background as shown in Figure 3.2

Figure 3.2

Here are some of the  common colors and the corresponding RGB codes. You can always experiment with other combinations, but remember the maximum number for each color is 255 and the minimum number is 0.

ColorRGB codeColorRGB codeColorRGB Code
255,0,0255, 255, 0255, 165, 0
0,255,00, 255, 2550, 0, 0
0, 0, 255255, 0, 255255, 255, 255

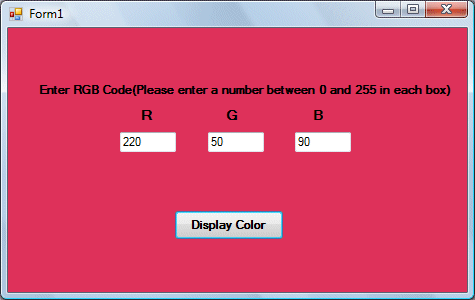
The following is another program that allows the user to enter the RGB codes into three different textboxes and when he/she  clicks the display color button, the background color of the form will change according to the RGB codes. This program allows users to change the color properties of the form at run time.

The code

Private Sub Button1_Click(ByVal sender As System.Object, ByVal e As System.EventArgs) Handles Button1.Click
  Dim rgb1, rgb2, rgb3 As Integer
  rgb1 = TextBox1.Text
  rgb2 = TextBox2.Text
  rgb3 = TextBox3.Text
  Me.BackColor = Color.FromArgb(rgb1, rgb2,rgb3)
End Sub

The Output

Figure 3.3


Lesson 2: Working with Controls

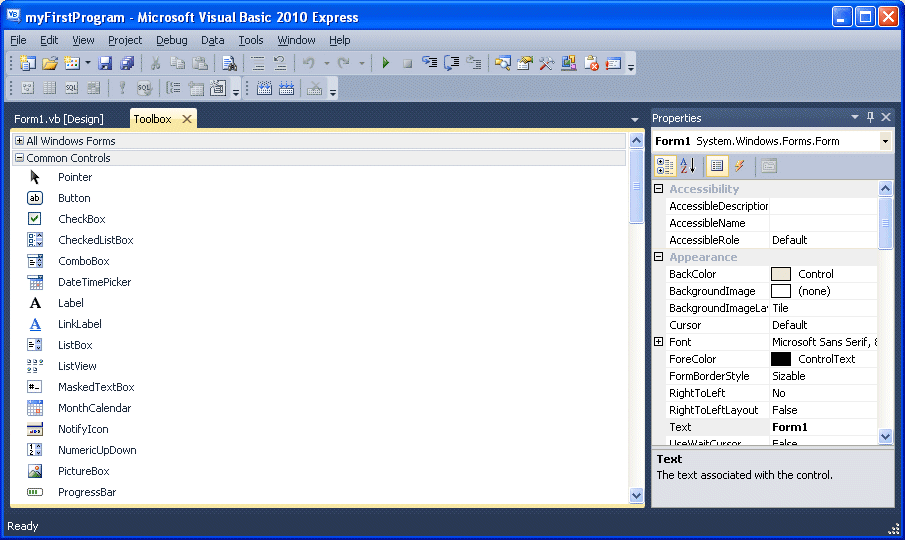
 The Controls in Visual Basic 2010 are objects that can be placed on the form to perform various tasks. To view the controls in VB2010, click on the Toolbox tab to bring up the common controls Toolbox as shown in Figure 2.1. The controls are categorized into Common Controls, Containers, Menus, Toolbars, Data, Components, Printings and Dialogs. At the moment, we will focus on the common controls. Some of the most used common controls are Button, Label, ComboBox, ListBox, PictureBox, TextBox etc.


Figure 2.1

To insert a control into your form, you just need to drag the control and drop it onto the form. You can reposition and resize it  as you like. Lets examine a few programs that made use of  Button, Label, TextBox , ListBox and PictureBox . You don't have to worry so much about the code because I will explain the program syntax as you progress to laterLessons.

2.1 Creating your first program

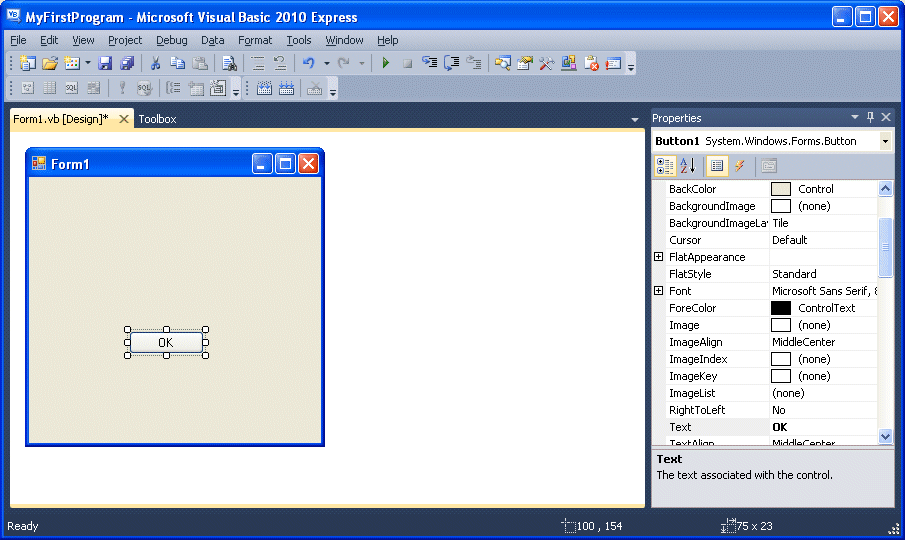
To create your first program,  drag the button control into the form, and change its default Text Button1 to OK in the properties window, the word OK will appear on the button in the form, as shown in Figure 2.2:

Figure 2.2

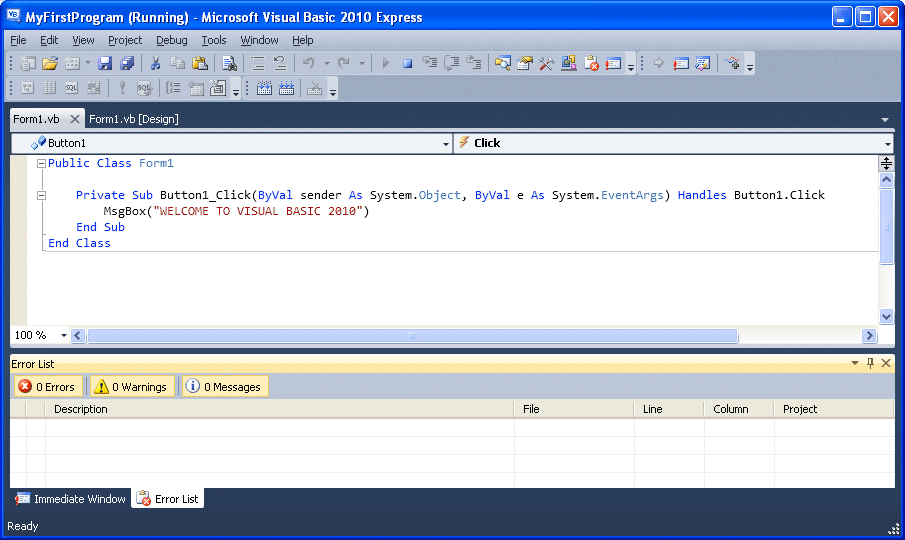
Next, click on the OK button and the code window appears. Enter the code as shown in Figure 2.3:

Figure 2.3

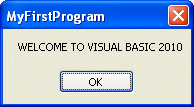
When you run the the program and click on the OK button, a dialog box will appear and display the "WELCOME TO VISUAL BASIC 2010" message,as shown in Figure 2.4:

Figure 2.4

2.2 Using the Text Box

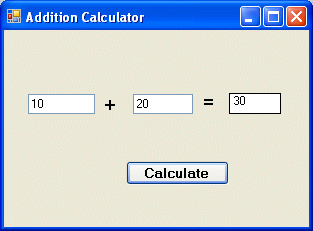
Next I will show you how to create a simple calculator that adds two numbers using the TextBox control. In this program, you insert two textboxes , three labels and one button. The two textboxes are for the users to enter two numbers, one label is to display the addition operator and the other label is to display the equal sign. The last label is to display the answer. Now change the label on the button to Calculate,then click on this button and enter the following code:

Private Sub Button1_Click(ByVal sender As System.Object, ByVal e As System.EventArgs) Handles Button1.Click

Dim num1, num2, product As Single
 num1 = TextBox1.Text
 num2 = TextBox2.Text
 product = num1 + num2
 Label1.Text = product

End Sub

When you run the program and enter two numbers, pressing the calculate button can let the progam performs addition of the two numbers, as shown in Figure 2.5.

Figure 2.5

Lesson 8 : String Manipulation

  String manipulation is an important part of programming because it help to process data that come in the form of non-numeric types such as...